Crafting a Stunning River Epoxy Chair: A Step-by-Step Guide
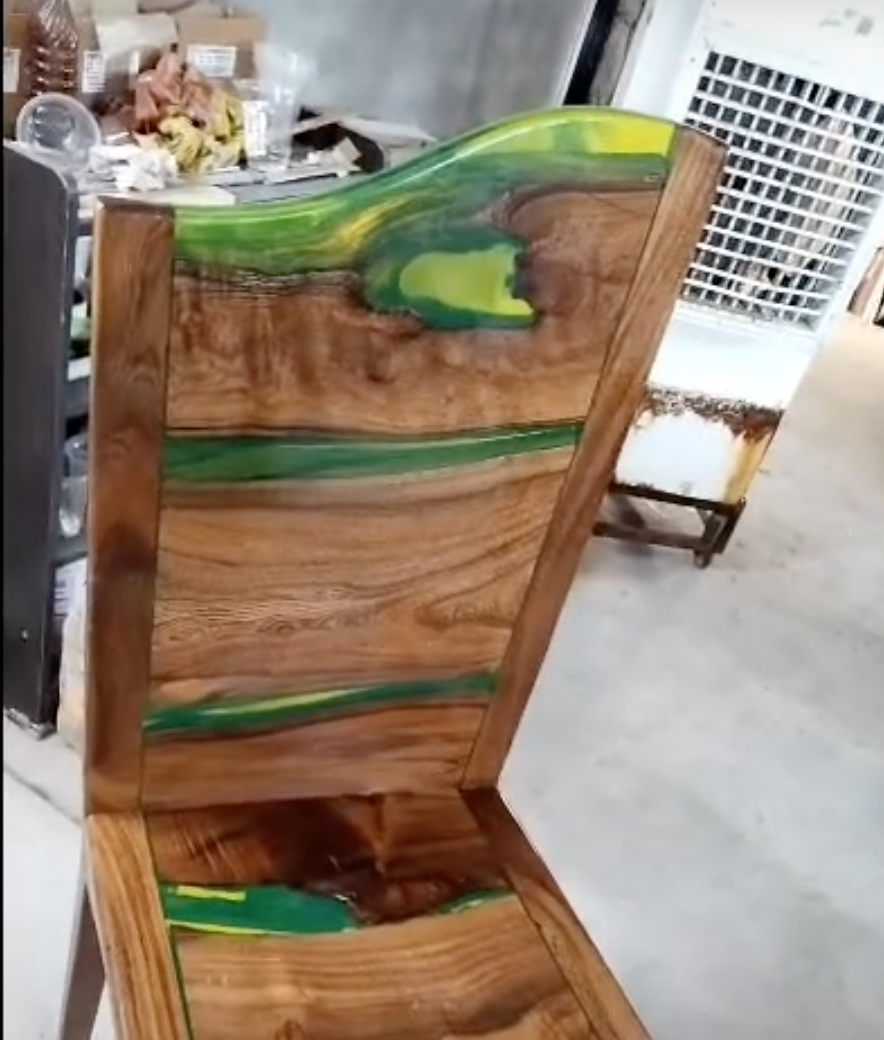
Creating custom furniture can be a deeply rewarding experience. When you combine the rustic charm of wood with the sleek, vibrant beauty of epoxy resin, you get a showpiece that will not only elevate the space it inhabits but become a conversation starter. One such creation is the River Epoxy Chair, a stunning fusion of natural wood and colorful resin that mimics the flowing beauty of a river. Whether you’re a seasoned craftsman or a weekend DIY enthusiast, this project will guide you through the process of designing and constructing your own river epoxy chair.
Materials List for River Epoxy Chair (All-in-One)
To craft your unique River Epoxy Chair, you’ll need a combination of wood, epoxy, and finishing materials, along with some essential tools to help you achieve a professional result. Below is the all-in-one materials list, making it easy to gather everything you need in one go.
Wood Materials
- Wood for Backing Frame & Base: Sturdy hardwood (e.g., oak, maple, walnut) for the main structure of the chair (for both the backing and the base).
- Wood for Planks: Clean, knot-free wooden planks to fill the backing frame, free of defects to ensure a smooth resin pour.
- Wood for Legs: Durable wood for the front legs and any other supporting legs for the base.
Epoxy Resin Materials
- Epoxy Resin Kit: High-quality, clear two-part epoxy resin that’s designed for deep pours and wood encapsulation. Look for a resin suitable for creating river tables or deep layers.
- Pigments for Resin: Epoxy-specific pigments in the following colors:
- Green
- Yellow
- Dark Green
- Mica Powder (Optional): For added shimmer or texture in the resin for a more dynamic effect.
- Resin Tinting Agents (Optional): To add depth or create layered effects in the resin.
Tools & Equipment
- Measuring Cups: For accurate measurement of resin and hardener.
- Mixing Sticks: To thoroughly mix the resin components.
- Plastic Spreaders/Spatulas: For spreading and manipulating the epoxy into the wooden planks.
- Heat Gun or Torch: To remove air bubbles from the resin and to manipulate the swirling colors.
- Sanding Tools: Orbital sander or hand sanding block (100-220 grit) for smoothing wood and resin surfaces.
- Beveling Tool: For creating beveled edges on the resin and wood for a professional, polished finish.
- Clamps or Heavy-Duty Tape: To hold the wooden planks together in place when building the mold.
- Painter’s Tape: To create barriers for resin spills or to seal areas where you don’t want resin to go.
- Ruler/Measuring Tape: To ensure precision in cutting and assembly.
Mold/Frame Materials
- Silicone Caulk or Tape: For sealing the mold and preventing leaks of resin.
- Mold Release Spray (Optional): To ensure the resin can be removed easily from the mold once cured.
Finishing Materials
- Clear Polyurethane Finish or Epoxy Topcoat: For applying a glossy, durable protective finish over the cured resin and wood.
- Fine-Grit Sandpaper (320-600 grit): For final sanding before applying the clear coat to ensure a smooth surface.
- Brushes or Foam Applicators: For applying the topcoat evenly to the wood and resin surfaces.
Safety Gear
- Gloves: To protect your hands when handling resin and wood.
- Safety Glasses: For eye protection during resin mixing and application.
- Dust Mask or Respirator: To avoid inhaling dust when sanding the wood or resin.
Optional Decorative Materials
- Gold or Silver Leaf: To add an extra touch of elegance, these can be embedded into the resin for a luxurious look.
- LED Lighting (Optional): For illuminating the resin with a hidden light strip for a glowing river effect.
Step 1: Crafting the Backing Frame
Begin by cutting a square wooden frame that will serve as the backing of the chair. The frame should be made from sturdy wood, chosen for its durability and visual appeal. However, what’s important is that the legs of the backing must be significantly longer than the sides of the square—this ensures the frame is elevated enough to allow for the next steps in the process.
Next, create the support for the backing by placing several clean, knot-free wooden planks inside the square. These planks will form the body of the backing and will eventually be encapsulated by the vibrant epoxy. Make sure the wood is well-prepared—free from any imperfections, and polished smooth to prevent any disruptions in the flow of the resin later.
Step 2: Preparing the Epoxy and Adding Color
The beauty of a river epoxy chair lies in the swirling colors of resin that simulate a river’s movement. Once your wooden backing is assembled, it’s time to focus on the epoxy. Mix your epoxy resin according to the instructions, ensuring a perfect balance between the two parts to avoid curing issues. Now comes the fun part: adding color!
For this project, we’ll use a combination of green, yellow, and dark green to create a rich, natural palette that mimics the look of a river or flowing stream. The key to creating the river effect is using different swirling techniques. Pour the resin in sections and allow the colors to naturally blend and swirl into one another, creating a fluid and dynamic pattern. Don’t be afraid to manipulate the colors slightly with a stick or heat gun to achieve those stunning, organic effects.
Once the resin is applied, let the backing cure completely. You’ll have a beautiful, colorful river effect that’ll serve as the foundation for the chair.
Step 3: Removing the Backing from the Mold
After the resin has fully cured and hardened, carefully remove the backing from its mold. The square shape will now be transformed into a captivating piece of art, with the epoxy setting into smooth, glossy surfaces that highlight the natural grain of the wood and the vibrant colors of the resin.
Step 4: Crafting the Base and Top Seal
The next step is to turn your attention to the chair’s base. Follow a similar process to that of the backing by creating a wooden base that will hold the entire chair together. As with the backing, make sure the wood is free of knots and imperfections to ensure a smooth and professional finish. Apply the epoxy using the same technique—add vibrant colors and allow them to swirl together for a cohesive look.
Now, just like the backing, you’ll need to cut off the front of the base, leaving just the epoxy as the feature material. This creates a seamless blend between the wood and the resin, ensuring that the epoxy takes center stage in your design. Follow the same method for the top of the backing—carefully cut off any excess wood, leaving just the beautiful resin design.
Step 5: Sanding and Beveling Edges
Once the epoxy on both the base and the backing has cured, it’s time to smooth and refine your piece. Sand the edges to remove any rough spots and achieve a polished, smooth finish. This step is crucial as it ensures that the resin is sleek, without any sharp edges. Bevel the corners of the backing and the base to give the chair a professional, finished look.
Step 6: Attaching the Legs and Final Assembly
Now that you have both the base and backing prepared, it’s time to add the legs. Attach the front legs securely to the base, ensuring that the chair will be stable and able to support weight. With everything aligned and securely fastened, attach the base to the backing. This step is critical to ensuring the structure is sound and that the chair will remain balanced.
Step 7: Finishing Touches
After the chair is fully assembled, take a moment to inspect the entire structure. Make sure all dust is removed before applying a clear coat finish. A glossy, protective coat will not only enhance the visual appeal of the resin but also ensure the longevity of your chair. Apply the clear coat evenly, allowing it to dry thoroughly between coats for a high-end, professional finish.
Conclusion: Your Custom River Epoxy Chair Is Complete
With your river epoxy chair now finished, you have a stunning one-of-a-kind piece that is sure to impress. The smooth, vibrant resin flowing through the wood creates a mesmerizing effect, while the craftsmanship and attention to detail speak to your skill as a builder. This unique chair not only serves as a beautiful accent piece in any room but also becomes a testament to the merging of nature and modern design.
Creating your own river epoxy chair is an exciting journey that combines artistry with craftsmanship. By following these steps, you can transform a simple wooden frame into a functional work of art that will be admired by all. Happy building!

