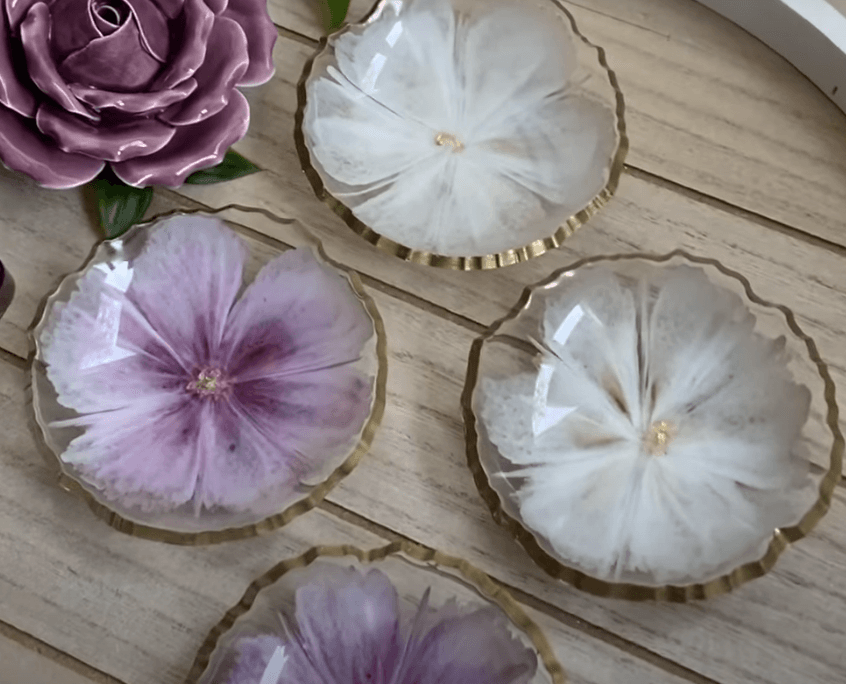
Gorgeous 3D Flower Resin Bowls Tutorial
Create stunning 3D flower resin trinket bowls with this easy and engaging tutorial! These unique bowls make perfect decorative pieces or gifts. Follow these steps to bring your artistic vision to life.
What You’ll Need
- Circular Silicone Mold
- Clear Epoxy Resin
- White Epoxy Resin
- Gold Epoxy Resin
- Glitter (for the center)
- Hair Dryer or Heat Gun
- Mixing Cups and Sticks
- Tape
- Small Cylinder (like a glass bottle for applying pressure)
- Gold Paint (for finishing touches)
- Gloves and Mask (for safety)
Instructions
Step 1: Prepare Your Workspace
- Set Up: Choose a well-ventilated area and cover your workspace to catch any spills.
- Safety First: Wear gloves and a mask to protect yourself from fumes.
Step 2: Pour the Clear Epoxy
- Mix the Epoxy: Prepare your clear epoxy resin according to the manufacturer’s instructions.
- Initial Pour: Pour a thin layer of clear epoxy into the circular mold. This will serve as the base for your flower design.
Step 3: Remove Bubbles
- Add Heat: Use a hair dryer or heat gun to gently warm the epoxy. This will help to solidify it slightly and remove any bubbles. Be careful not to overheat the resin.
Step 4: Create the Flower Design
- Mix Gold and White Epoxy: In separate cups, prepare the gold and white epoxy resins.
- Pour Gold for Flowers: Using the gold epoxy, create a flower pattern by pouring slowly from a cup, allowing a steady drizzle.
- Add White for Detail: Follow up with the white epoxy, drizzling it on top in the same flower pattern. Allow the two colors to sit and blend slightly.
Step 5: Blend Carefully
- Gentle Heat Application: Use the heat gun to help the gold and white epoxy blend together, creating a soft, floral effect. Be cautious not to distort the circular pattern as you work.
Step 6: Add Glitter
- Sparkling Center: While the epoxy is still malleable, sprinkle some glitter into the center of the flower design to add a touch of sparkle and depth.
Step 7: Shape the Bowls
- Pressing into Shape: Once the epoxy has cured enough to be pliable, gently place the mixture into the bowl shape. Press down lightly to form the desired bowl shape.
- Apply Pressure: Use tape and a small glass bottle or cylinder to apply even pressure across the bowl as it cures.
Step 8: Final Curing
- Let It Cure Completely: Allow the epoxy to fully cure according to the manufacturer’s instructions.
Step 9: Finishing Touches
- Paint the Edges: Once the bowl is completely dry, use gold paint to carefully paint the edges, enhancing its beauty and giving it a polished look.
Enjoy Your Creation!
Your beautiful 3D flower resin trinket bowl is now ready to be displayed or used! This elegant piece will add a touch of charm to any space. Enjoy your crafting journey and the satisfaction of creating something truly unique!


