Surf’s Up: A DIY Surfboard Epoxy Table
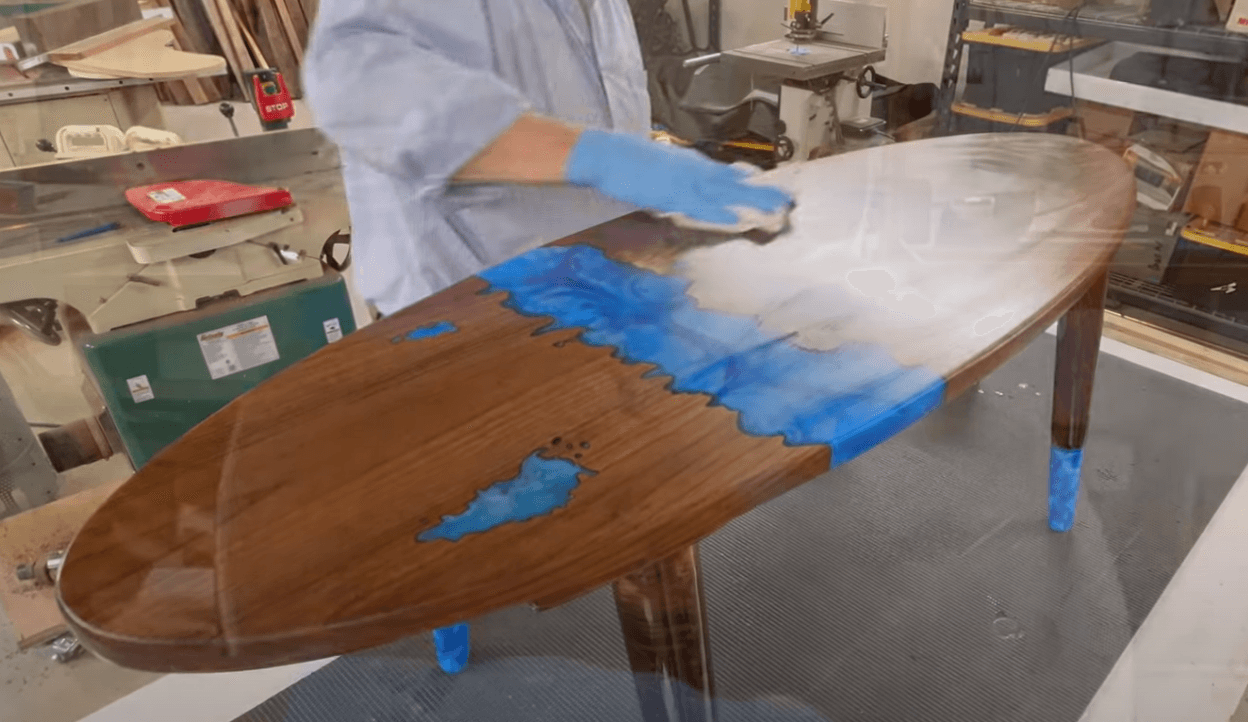
Ready to turn your love for surfing into a stunning piece of furniture? This DIY Epoxy project will guide you through the process of crafting a unique surfboard-shaped table. By combining the natural beauty of wood with the mesmerizing allure of epoxy resin, you’ll create a one-of-a-kind centerpiece that’s sure to catch waves of admiration.
Let’s craft a unique, ocean-inspired table that captures the spirit of surfing.
Materials:
- A beautiful piece of walnut wood
- Clear epoxy resin
- Blue and white pigment
- Wood planer
- Wood finish
- Silicone mold (optional)
- Sandpaper
- Wood stain (optional)
- Table legs
- PVC pipe
- Surfboard (for shaping)
- Chalk
Instructions:
- Prepare the Walnut Base:
- Planing: Use a wood planer to smooth the surface of the walnut, ensuring it’s free of any imperfections.
- Widening the Plank: Glue two additional pieces of walnut to the sides of the main plank to widen it to your desired table size.
- Shaping the Surfboard Silhouette: Use a surfboard as a template. Trace the outline onto the walnut using chalk. Then, use a jigsaw or bandsaw to cut the wood into the surfboard shape.
- Creating the Resin Wave Effect:
- Mix the Resin: Combine clear epoxy resin with blue and white pigments to achieve the desired ocean-wave effect.
- Pour the Resin: Pour the colored epoxy resin onto the surface of the walnut, creating a wave-like pattern.
- Curing: Allow the epoxy to cure completely according to the manufacturer’s instructions.
- Adding Structural Support:
- Attaching the Bottom Support: Glue a piece of walnut to the bottom of the surfboard-shaped table to provide additional support for the legs.
- Creating the Legs: Cut wooden legs to your desired height. For a unique touch, insert PVC pipe into the wooden legs and fill with epoxy. Once cured, sand away the PVC, leaving a sleek, epoxy-filled leg.
- Assembling the Table:
- Attaching the Legs: Drill holes into the bottom support and the legs. Use wood screws or pegs to secure the legs to the table.
- Finishing Touches: Sand the entire table to smooth any imperfections and apply a clear coat of epoxy resin or a wood finish to protect the surface.
Your custom surf’s up table is now ready to ride the waves of your living room!
Tips for a Perfect Finish:
- Safety First: Always wear protective gloves and a mask when working with epoxy resin.
- Patience is Key: Allow the epoxy to cure fully before proceeding to the next step.
- Clean Up: Clean your tools immediately after use with acetone or isopropyl alcohol.
- Experiment with Colors: Try different color combinations to create unique and personalized designs.
- Lighting: Consider using LED lights to illuminate the resin waves from below, creating a dramatic effect.
With this DIY guide, you can create a truly unique and eye-catching piece of furniture that captures the spirit of surfing.

